Exchange Round-Trip Email Wizard
The Exchange Round-Trip Email Wizard configures an IMAP4, POP3, or MAPI User Experience monitor with the least amount of initial input. Using this wizard, you can test all parameters you enter along the way to make sure that the new monitor will work as expected before going live in a production environment.
Before you create a MAPI User Experience monitor using this wizard, ensure that the monitor can access the Microsoft Outlook messaging subsystem. A full Microsoft Outlook version that supports the MAPI protocol must be installed on the ipMonitor server. Microsoft Outlook does not need to be running for the monitor to function correctly. Additionally, make sure that you have a Microsoft Outlook email account under the default mail profile of the Windows user account impersonated by the monitor.
- Click Devices in the toolbar.
- Locate and click the targeted device you want to monitor.
- In the toolbar, click Add > Add New Monitor.
- In the Select Monitor page, click Exchange Round-Trip Email Wizard.
-
Select an email protocol, and click Next.

Select POP3 to verify that your SMTP server can receive and distribute email. This option also verifies that your end users can log in from a POP3-enabled client and retrieve their email
Select IMAP4 to verify that your SMTP server can receive and distribute email. This option also verifies that your end users can log in from an IMAP4-enabled email client and retrieve their email.
Select MAPI to verify that your SMTP server can deliver an email message to a Microsoft Exchange Server mailbox and retrieve the message using the Microsoft Messaging Application Program Interface (MAPI).
The following steps illustrate a POP3 email protocol selection.
-
Enter the parameters of your Microsoft Exchange Server.
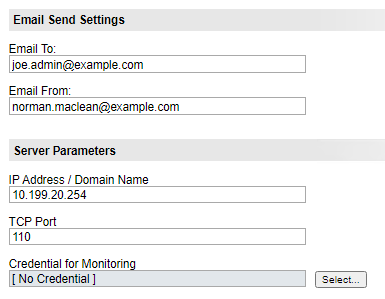
- Enter the email address that receives the test email.
- Enter the email address that originates the test email.
- Enter the IP address or domain name of the SMTP server you want to monitor.
- Enter the TCP port on the SMTP server you want to monitor.
- Click Select and select a credential that includes the account and password information of the target server.
- Click Next.
- Create the monitor.
- Enter a descriptive name for the monitor. This name will appear in the Monitor List, Monitor Status, Reports, and Logs pages.
- Click the Select Group drop-down menu and select an existing group that will host the new monitor.
- (Optional) Select the checkbox to begin recording the record results. The results are used to generate the Recent Activity and Historical Reports. This option is disabled by default.
- Click Create.
- Make any additional changes as required, and then click OK.