Stop DPA alerts for a period of time
To stop alerting for a period of time, create an alert blackout. For example, you can create an alert blackout to suppress alerts during a maintenance window.
Open the Alert Blackouts tab
To open the Alert Blackouts tab from anywhere in DPA:
- From the DPA menu in the upper-right corner, click Alerts.
-
In the upper-right corner, click Manage alerts.
-
Click the Alert Blackouts tab.
If you opened the Alert details page to view information about the alert, you can open the Alert Blackouts tab from there:
- Click the Commands menu in the upper-right corner.
- Choose Blackouts.
Create an alert blackout
- Open the Alert Blackouts tab.
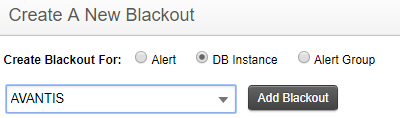
- Specify whether you want to create a blackout for an alert, a database instance, or an alert group.
-
Select the alert, database instance, or alert group, and then click Add Blackout.
- Specify the beginning and end of the blackout period. Times are based on a 24-hour clock.
-
If the blackout period is for an alert, select All Databases or specify the database instances that this alert should not run on.
If the blackout period is for a database instance, select All Alerts or specify the alerts that should not run.
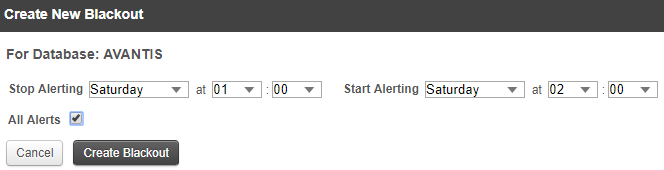
- Click Create Blackout.
The blackout is effective each week on the specified day and time until it is deleted.
Edit an alert blackout
- Open the Alert Blackouts tab.
- Under Existing Blackout Periods, locate the blackout period and click Edit.
-
Update the schedule and the affected alerts or database instances.
You cannot change the original target of the blackout period. For example, if the blackout period was created to suppress all alerts on a database instance, you cannot change it to suppress a specific alert on multiple database instances. To make that type of change, delete the blackout period and create a new one.
- Click Save Blackout.
Delete an alert blackout
- Open the Alert Blackouts tab.
- Under Existing Blackout Periods, locate the blackout period and click Delete.
- At the confirmation prompt, click Yes.