Discover your Exchange environment
This SolarWinds Platform topic applies only to the following products:
Hybrid Cloud Observability Essentials — Hybrid Cloud Observability Advanced
NPM — SAM — SRM — VMAN — WPM
Discovery is a term used to describe the process the SolarWinds Platform uses to identify servers, applications, and other network elements that can be monitored. Discovery is the first step in comprehensive Exchange monitoring. During discovery, the SolarWinds Platform polls the devices on a segment of the network that you specify and checks for the readiness of a device. If a device is operational, that device is discovered and you can add it to the SolarWinds Platform database for monitoring.
When you are monitoring your Exchange environment, you should discover all network elements that are a part of that environment. In the SolarWinds lab environment, the Exchange topology includes:
-
Exchange servers: During discovery, the SolarWinds Platform automatically identifies Exchange servers and assigns a SAM AppInsight for Exchange template for monitoring. You do not need to complete any extra configuration to monitor your Exchange servers.
-
Internet Information Services (IIS): By virtue of discovering your Exchange servers, the SolarWinds Platform also automatically assigns a SAM AppInsight for IIS template for monitoring. You do not need to complete any extra configuration to monitor IIS.
In this example, because the Exchange servers are registered to an Activity Directory Domain Controller, you only need to discover the domain controller.
-
F5 BIG-IP Load balancer: If your Exchange environment includes a load balancer, the load balancer ensures continuous access to the Exchange servers, actively switching Exchange servers if one goes down without interruption to end users.
SolarWinds recommends discovering the Exchange servers and the load balancer separately, because they require different types of polling:
- For Exchange servers, WMI polling provides much more detailed information.
- For the load balancer, SNMP polling is required.
The following example shows you how to use the Network Sonar wizard to add the Exchange servers, and then how to manually add the F5 load balancer.
Prerequisites
- Install at least one SolarWinds Platform product (for example, SolarWinds SAM or SolarWinds NPM)
- Collect the following information:
- The IP address or host name of the domain controller, or the DNS name of the domain
- The credentials of the domain controller
- The IP address of the load balancer and iControl credentials
Discover your Exchange servers
The guidelines in this section are specific to discovering your Exchange environment. For additional information about discovery, including detailed steps that include screen shots, see Discover your servers and applications in the SAM Getting Started Guide.
- Log in to the Web Console and select Settings > Network Discovery.
- On the Welcome page, click Start.
- Complete each panel of the Discovery wizard:
Panel Action(s) Network - Click Add Active Directory Domain Controller to query.
In the Active Directory Domain Controller field, enter the domain controller IP address or host name, or the DNS name of the domain.
In Active Directory discovery, the DNS domain name can be entered in place of the domain controller name or IP address.
- Enter the domain controller credentials, and click Next.
On the Organizational Units dialog box, select the organizational units you want to scan, and click Finish.
SolarWinds recommends that you select all organizational units that contain servers and other network hardware. You can clear the units that do not include hardware, including:
- ForeignSecurityPrincipals
- Managed Service Accounts
- Microsoft Exchange Security Groups
- Recycle Bin
- Users
- Be sure that the Import servers option at the bottom of the dialog is selected.
Agents Click Next.
Virtualization Click Next. SNMP Click Next. Windows Enter the Windows credentials. Monitoring Settings In the Include devices/nodes that respond to ICMP (ping) alone field, click No.
When you are monitoring Exchange, nodes that return only up or down status information provide little value.
In the Preferred Polling Method field, select WMI.
WMI polling provides much more detail about the Exchange environment than SNMP. For example, SNMP does not show the Exchange mount points.
In the How Would You Like to Set Up What to Monitor field, click Manually.
Automatic monitoring is appropriate for a more targeted discovery.
Discovery Settings Enter a name and description for the discovery job and examine the retry and timeout defaults, and click Next. If you are on a slower network, consider increasing the Discovery Timeout value, for example to 120. The default values for all other settings are appropriate for most environments.
Keep the Hop Count at 0. Specifying a number of hops results in multiple scans throughout your environment, which adversely affects the time necessary to complete the scan.
Discovery Scheduling Choose Once and Yes to run the discovery immediately. Then click Discover. A dialog box displays the progress.
Import discovered nodes
The Network Sonar Results wizard lists the nodes that were discovered so that you can determine which ones to import. For detailed steps that include screen shots, see Add discovered devices to SolarWinds SAM in the SAM Getting Started Guide.
Only imported network elements count against your license.
| Panel | Action(s) |
|---|---|
| Devices | Leave all devices selected, and click Next. |
| Interfaces |
SolarWinds recommends leaving the default interface selections, and click Next. |
| Volumes |
If your Exchange servers are in a DAG configuration, verify that the number of Mount Points is not 0, and that Mount Points are selected. If your servers are in a DAG configuration and Mount Points is 0, your Exchange server was not discovered. Make sure that WMI is selected when you discover your Exchange environment. SolarWinds recommends that you clear the Floppy Disk, Compact Disk, and Removable Disk check boxes. |
| Applications |
Because the discovery is focused on an Exchange environment, SolarWinds recommends clearing Windows Scheduled Tasks and Microsoft SQL Server. |
| Import Preview |
Review the list of everything that will be imported, and click Import. |
| Results |
When the import is complete, click Finish. To see the network elements you imported, click My Dashboards > Home > Summary. After they are discovered and imported, the Exchange servers and IIS applications show a status of unknown in the Applications with Problems resource. This is normal. When you configure the server and reassign the credentials, your Exchange servers and IIS applications are monitored. |
Add F5® BIG-IP® load balancer
To visualize the load balancing environment delivering Exchange services and get the instant status of individual components, add the load balancer device. Poll status and health statistics on the device with SNMP, and enable iControl on the node so you can change the rotation of pool members and see the health monitors.
Before you begin:
- If you are planning to use NPM to monitor network performance in your Exchange environment, review the requirements for Network Insight for F5 BIG-IP load balancers.
- Prepare the IP address of your load balancer and iControl credentials.
- Click Settings > All Settings, and click Add Node in the Getting Started grouping.
- Enter the IP address for the device.
- Select Most Devices: SNMP and ICMP as the polling method.
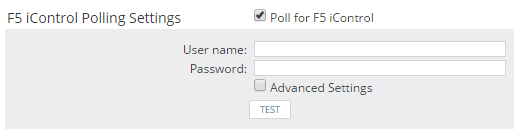
- Enable F5 iControl:
Scroll down to Additional Monitoring Options, select Poll for F5 iControl, provide the credentials for accessing the iControl API on the F5, and click Test.
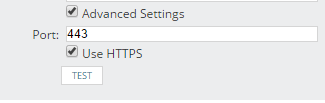
If iControl does not run on the default port 443, select Advanced Settings, and provide the port.
- Complete the Add Node wizard.
Both status information and health statistics will be collected on the F5 device, and you can now monitor your load balancing environment.
Next steps
To configure your SolarWinds modules for comprehensive Exchange monitoring, see any of the following topics:
- Monitor Exchange servers and IIS applications with SAM
- Monitor the virtual Exchange environment with VMAN (only if your Exchange servers are virtualized)
- Monitor Exchange storage issues with SRM
- Monitor Exchange network performance with NPM
- Monitor the Exchange user experience with WPM
After configuring one or more SolarWinds modules:
- Set up alerts to monitor your Exchange environment.
- Filter the AppStack to show only your Exchange environment