Deploy an agent with Patch Manager
This topic applies only to the following SolarWinds Platform products:
Hybrid Cloud Observability Essentials — Hybrid Cloud Observability Advanced
LA — NAM — NPM — SAM — SCM — SRM — VMAN*
You can only perform this deployment method if you have successfully configured Patch Manager to push software in your environment. This method contains four parts you must perform in order: download the installation files, build the package, add deployment rules, and publish the package.
Download the installation files
First, you need to download the SolarWinds Platform Agent software installation files including an MSI and MST file.
-
Click Settings > All Settings in the menu bar.
-
Under Product Specific Settings, click Agent & Remote Collector. Then, on the Agent Management view, click Download Agent Software.
In Orion Platform 2020.2 and earlier, click Agent Settings to get to the Agent Management view with the Download Agent Software link.
- Click Windows, and click Next.
- Click Mass Deploy to Multiple Machines, and click Next.
- Select the communication method and enter the required information. For more information, see Mass deploy an agent on Windows.
- Download and save the MSI and MST files to a location on your Patch Manager server.
Record the Latest Version value under the MSI file download. This is needed when creating a package in Patch Manager.
Optional: Rename the SolarWinds agent files to
SolarWinds Agent <version>for easier tracking.
Build the package
Next, create a package of the SolarWinds Platform Agentt installation files.
-
Launch SolarWinds Patch Manager.
-
In the navigation pane, expand Administration and Reporting > Software Publishing, and then click SolarWinds, Inc. Packages.

-
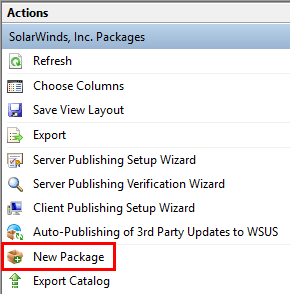
From the Actions pane, click New Package. This launches the Patch Manager Package Wizard.
-
In the package information screen, enter the following minimum general information for the package:
- Package Title: SolarWinds Orion Agent (version number) MSI
- Description: SolarWinds Orion Agent
- Classification: Tools
- Vendor: SolarWinds, Inc.
- Product: Orion Agent (This must be entered the first time)
- Severity: None
- Impact: Normal (Used to determine the push schedule)
- Reboot Behavior: Can request reboot (Determines if the products requires a reboot)
All other fields can be left empty.
-
Click Next. Continue adding deployment rules through the Patch Manager Package Wizard.
Add deployment rules
-
On the Prerequisite Rules window, click Add Rule.
-
Select Create Basic Rule.
-
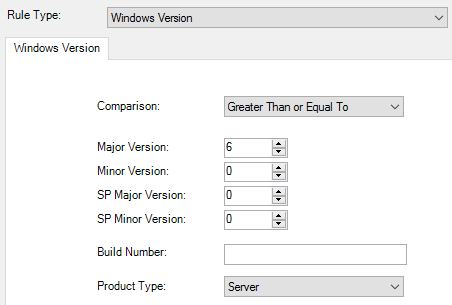
Select Windows Version as the Rule Type, and enter the following information:
-
Click OK to save this rule, and click Next.
-
On the Select Package window, select the Package Type as a Microsoft Installer File (.msi), and select I already have the content for the package locally on my network.
-
Click the browse icon and locate the MSI file for the SolarWinds Platform agent. The Download URL field will automatically populate.
-
The GUID product code is extracted from the MSI file and displayed for review. Copy the GUID product code that you will use later.
The GUID is detected from the installer. Use the one displayed in your environment.
-
Select Includes additional files with the package, and click the button to the right to open the Package Content Editor.
-
In the Package Content Editor, click Add Files, and browse to the MST File for the SolarWinds Platform agent.
-
Click OK to close the Package Content Editor. To confirm that you want to add these files to the cache, click Yes.
-
Select None for the Binary Language.
-
In the Command Line field, enter:
TRASNFORMS=(MST FILE NAME)Example:
TRANSFORMS=SolarWinds_Agent_1.5.0.951.mst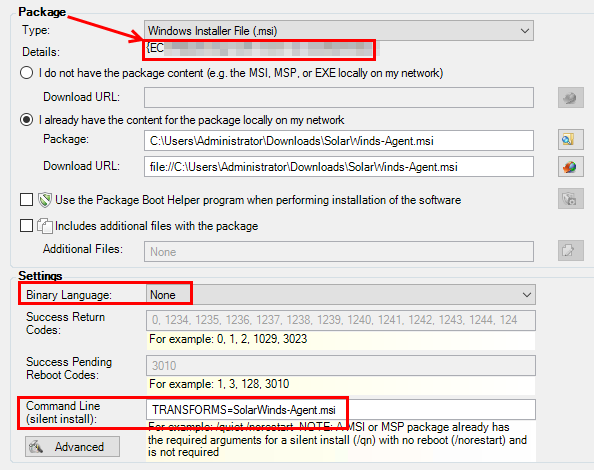
-
Click Next.
-
On the Applicability Rules window, click Add Rule > Create MSI Rule.
-
Select Rule Type: Product Installed, and select Not Rule.
-
Enter the product code without the brackets, and leave all other fields empty.
-
On the Installed Rules window, click OK to save the rule, and then click Next.
-
Click Add Rule > Basic Rule.
-
For the Rule Type, select File Version with Registry Value. Enter the following values:
- Registry Key:
HKEY_LOCAL_MACHINE\SOFTWARE\Wow6432Node\SolarWinds\Agent - Registry Value:
InstallDir - Sub-path:
SolarWinds.Agent.Service.exe - Comparison: Equal To.
- Version: Version number of the agent
- Registry Key:
-
Click OK to save the rule, and click Next. Review the Summary Page, and enter notes at the bottom.
-
Click Next to save, and click OK.
When the file packaging and uploading completes, a Package Saved dialog displays.
Publish the package
-
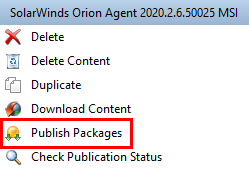
In the SolarWinds, Inc. Packages view in Patch Manager, select the SolarWinds Orion Agent package that you created.
-
In the SolarWinds Orion Agent action pane, click Publish Packages.
-
Accept the default selections, or choose a specific Windows Server Update Services (WSUS) server for publication, and then click Next.
-
You are notified when the package publishes.
-
Click Finish to close the Publishing Wizard.
Finally, approve the package:
-
In the Patch Manager Console, move up to Patch Manager / Enterprise / Update Services / (Your WSUS Server Name) / All Updates.
-
Click on the newly created and published package.
-
Right-click on it and select Approve. From here, you can determine which groups can get the new package and setup a schedule. Handle the package as you would any other patch package.
The package for the SolarWinds Platform agent is packaged and published to your WSUS server.