Set up monitoring for Cisco Nexus devices in NPM
Data for monitoring Cisco® Nexus switches are polled by a combination of SNMP and CLI polling. To get accurate Nexus-specific information, add the device to NPM as a node, and provide CLI credentials.
What does CLI polling provide for Nexus devices?
Enable CLI polling to receive additional details about virtual port channels (vPC), and to display the list of vPCs for your Nexus devices.
Information polled by CLI
- vPCs on the device and their status
- peer vPCs (Switch Virtual Interfaces are supported from NPM 2020.2.6)
- keep-alive links
- related interfaces
You can provide the CLI credentials in the last step of the Add Node wizard when adding a Nexus node, or on the Edit Node page.
Requirements for Network Insight for Cisco Nexus devices
| Requirement | Details |
|---|---|
| Cisco Nexus versions |
5000 Series |
| Nexus configuration |
The vPC feature must be configured. To verify that you have vPCs configured, run the following command on the device:
If the command doesn't list any vPCs, you need to configure them. NPM doesn't display vPC peer links. If the command lists only vPC peer links, adjust the configuration to include vPCs. |
| Nexus user account | Credentials for logging into the Nexus device. |
| Enable password |
If you have configured an enable password, you need to provide it. |
| SSH port |
By default, port 22. Open an SSH port for accessing and polling Nexus devices through SSH. |
Add Nexus devices for monitoring
You need Node Management Rights. See Define what users can access and do.
-
Click Settings > Manage Nodes, and then click Add Node.
-
Enter the IP address for the device.
-
Select Most Devices: SNMP and ICMP as the polling method, and enter SNMP credentials.
-
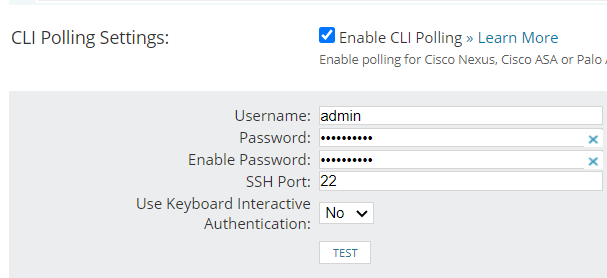
Enable CLI monitoring:
- Scroll down to CLI Polling Settings.
- Select Enable CLI Polling, enter the credentials, and click Test.
Enter a user name and password for logging into the ASA or Nexus device.
If you have configured a security password for CLI polling on the device, provide it in Enable password. Without the Enable Password, CLI polling does not work.
-
To use a specific device template, select it. See NCM Getting Started Guide for more information.
-
Complete the Add Node wizard.
NPM now polls the Nexus-specific information.
Enable CLI polling on monitored devices
To poll vPC data on Nexus devices already monitored in NPM, enable CLI polling.
- On the node details view, click Edit Node in the Management widget.
- Scroll down to the CLI Polling Settings section.
- Select Enable CLI Polling, enter the credentials, and click Test.
- Click Submit.
You can now poll device-specific information, such as vPCs. The node details view for your Nexus devices includes the vPC subview listing all vPCs with their member ports.
Troubleshoot monitoring Cisco Nexus devices
Verify the following:
- The node or interface is monitored in NPM.
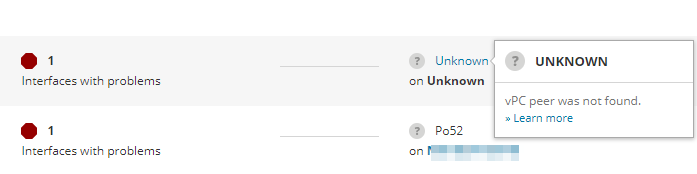
If your vPC is configured, NPM can see that it has a peer. There are no details about the peer node. To see the details, add the node to NPM for monitoring and enable CLI polling.If you only have NCM installed and cannot see any vPCs, download the running config to get a list of vPCs configured on the device. To get more information about vPCs, install NPM.
- You have enabled CLI polling on the device.
- You are using the correct user credentials to log in to the device.
- You are using the correct password for CLI access.
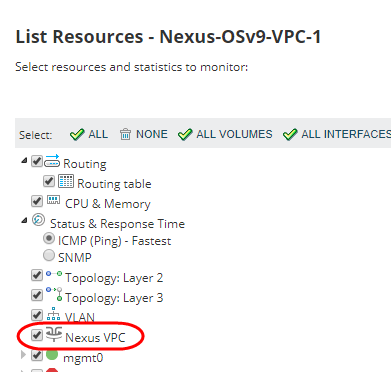
- You have enabled the Nexus vPC poller:
- On the node details view, click List Resources in the Management resource.
- Ensure Nexus VPC is selected.
Cannot see peer nodes?
If you cannot see the peer node for monitored vPCs, make sure the keep-alive link is alive.
To verify the keep-alive link, run the following command on the device:
show vpc peer-keepalive
Review the command output. The vPC keep-alive status must have the following value:peer is alive.
If the value is different, adjust the configuration on the device.
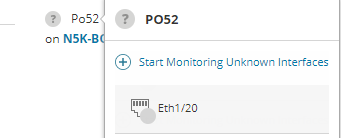
The interface (port channel) is grey
If an interface is grey and you only see the peer vPC name, click Start monitoring unknown interfaces, and select All interfaces on the List Resources page.
If you don't want to monitor all interfaces on the device, select at least the interfaces displayed for the vPC on the vPCs subview.
If the vPC on the peer is unknown, the vPC is not configured on the peer node.
Check the configuration on the device, and make sure the vPC is configured correctly.
Extend logging
If the above steps do not solve your issue, enable the CLI session trace to extend logging:
- Click Settings > All Settings > CLI Settings in the Product Specific grouping.
- Click Enable Session Tracing, and click Submit.
Review the session trace files located at:
%ALLUSERSPROFILE%\Application Data\SolarWinds\Logs\Orion\CLI\Session-Trace