Create and configure end user accounts
End user accounts are special Dameware Remote Everywhere users that are converted from technician accounts, and have limited access to a number of devices through a special web portal called the End User Area. End User accounts are restricted to the End User Area where they can only access devices to which they have been granted permission.
After downloading the Dameware Remote Everywhere Viewer, End Users can remotely access their computers and devices, and open Deferred Support Requests for any of those devices. During remote access, these users are limited to the Remote Desktop, and File Transfer tabs, as well as the Computer, Session, View, Commands, and Interactions menus in the Viewer.
To get started creating End Users, add a new technician to your account.
Add a technician to your account and configure them as an end user
-
From the Admin Area, navigate to Management > Technicians, and click Add.
-
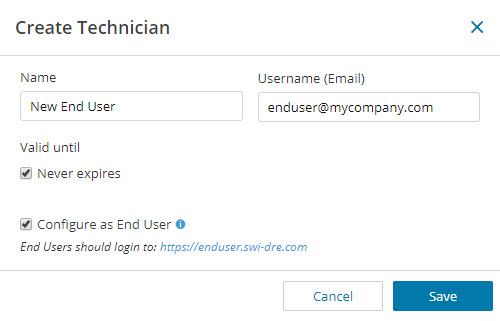
Enter the Name and Email for the end user, select Configure as End User and click Save.
-
Saving the new End User sends them an SSO (Single Sign On) invitation email with instructions on how to set up their SSO account and log in to the End User area. Click Send invitation to resend the SSO (Single Sign On) invitation if needed.
-
You can edit the new End User's information from the Technician tab. Select the Access FTP option to allow the End User to transfer files during remote access.
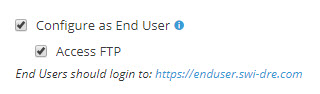
Uncheck the Access FTP option to disable the File Transfer tab during remote access. This restricts the End User to only the Remote Desktop tab.
-
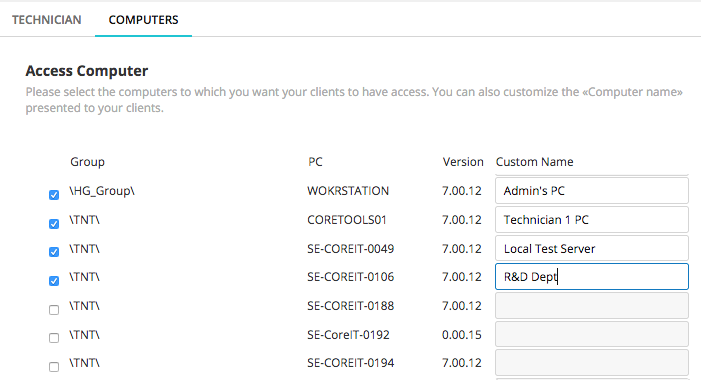
After saving the End User, the Permissions and Default Settings tabs of the Technician Configuration window are replaced with the Computers tab, where you can choose which devices the End User can access. Select the Computers tab, and use the Custom Name field to change the name of each computer to which the end user has access. Each device's Custom Name is displayed in the End User area.
-
Save your changes to grant the End User access to the selected devices.
After the new End User is authenticated using the SSO invitation email, they can log in to the End User Area here: https://enduser.swi-dre.com/login.php
Create a SolarWinds SSO Account and log in to the End User Area
The new end user will receive an Enrollment Notification email and they can use the Create Login button in the email to set their password and create their new SolarWinds SSO account. After the new SSO account is created, the end user is prompted to download theDameware Remote Everywhere Viewer in order to access the computers to which they were granted access.
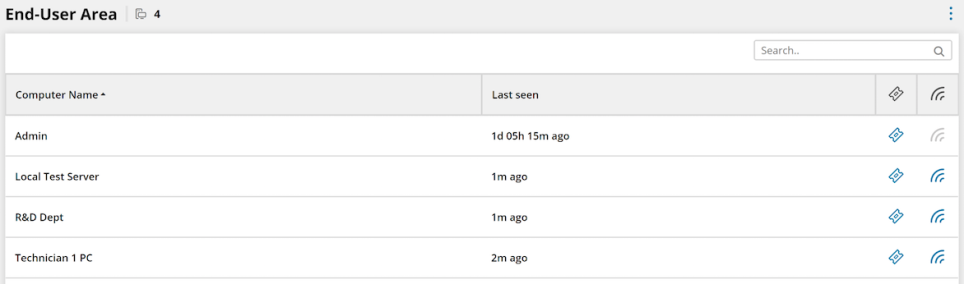
This automatically logs the user into the End User area where they can view the devices to which they were granted permission to access.
-
Use the Connect icon
 next to the relevant device to start a remote session. During a session, the end user is restricted to the Remote Desktop and File Transfer tabs, as well as the Computer, Session, View, Commands and Interactions menus.
If the Connect icon is grayed out and not clickable, it means that specific device is offline.
-
Select the Ticket icon
 next to the relevant device to generate a Deferred Support Request without establishing a remote session.
If the ticket icon is not displayed next to a device, it means that device is not configured to create Deferred Support Requests. To grant an End user permission to create Deferred Support Requests, navigate to the Devices section of the Admin Area, select the device from the list and click Edit to access the Edit Device window. In the Permissions section, make sure Remote user can create Deferred Support Request is turned on.
-
Click to re-download the Viewer or select Log out to leave the end user area.